I plan to design and sew a couple felt ornaments every week until Christmas. I’ll be sharing the patterns here for anyone who is interested!
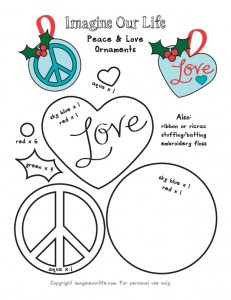 Peace & Love
Here are my first two ornaments: Peace and Love. Some of the photos came out with the colors off, but the photo at the top is accurate.
The supplies you’ll need are:
Felt (in red, sky blue, aqua blue and green), embroidery floss (in red, aqua blue and green), red ribbon or ric-rac, batting/stuffing, needle, scissors, pins, water-soluble marker or thin Sharpie and the pattern print out.
 Start by cutting out your pattern pieces, pinning them to the felt and cutting all the elements out.
- Decorate the fronts of each ornament. For the Peace sign, I did the stitch I usually use when sewing a felt applique: short, perpendicular stitches across the edge of the applique all the way around. I did the same for the berries, but sewed the leaves down first. For the leaves, I did a simple back stitch ⅓ of the way up the centers and left the rest loose. On the Love ornament I did the little heart and the holly with the same techniques.
 To transfer the text, I pinned the pattern behind the felt and held it up to a light. I was then able to trace over the word with a marker. I sewed the word using a chain stitch with 4 strands of floss (I normally use 2 strands for everything else.)
 - Cut two 6″ length of ribbon or ric-rac. Fold them into loops and pin them in place between the two sides of each ornament. Sew halfway around each ornament with a blanket stitch (I used red floss as an accent.) Add batting or stuffing (I used batting and cut them ¼” smaller than the main shape) then continue all the way around to finish them.
Simple and sweet!
If you make your own, I’d love to see them! Send me a photo or link and I can add yours to this post.



These are so cute! I’ve been having lots of fun making my own felt ornaments this year. Merry Christmas! 🙂